Recent Posts
LIN To CAN Bus Gateway - Prototyping And Firmware Development With The Arduino-Compatible Teensy Board
Posted by on

In general, let's start with a brief comparison of CAN Bus (Controller Area Network) and LIN Bus (Local Interconnect Network): LIN Bus networks provide cost-efficient communication in applications where the bandwidth and versatility of the CAN Bus technology are not required.
LIN Bus applications are relatively inexpensive using the standard serial universal asynchronous receiver/transmitter (UART) technology, which are embedded into most modern low-cost microcontrollers such as, for instance, the Arduino-compatible Teensy 3.2.
Lin Bus vs. CAN Bus
- LIN is lower cost (less harness, no license fee, cheap nodes)
- CAN uses twisted shielded dual wires (5V), while LIN uses single wire (12V)
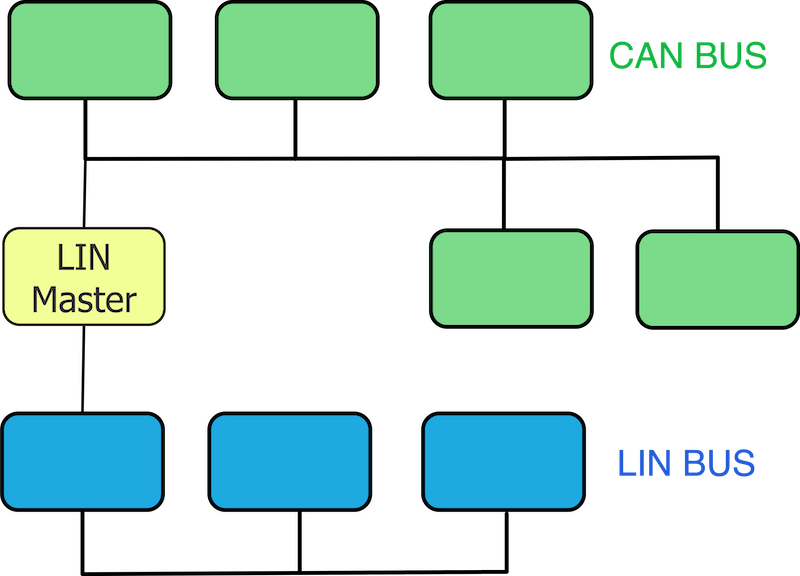
- A LIN master typically serves as gateway to the CAN bus
- LIN is deterministic, not event driven (i.e. no bus arbitration)
- LIN clusters have a single master - CAN Bus supports multi-master operation
- CAN uses 11 or 29 bit identifiers vs a 6 bit identifiers used by the LIN BUS
- CAN offers up to 1 Mbit/s vs. LIN at max 20 kbit/s
LIN To CAN Gateway Requirements
In view of the previously described features and applications of both serial communication technologies, there is very obviously a need to connect both networks. However, due to the very different nature of both protocols (i.e. their hardware layers, transmission speed, message frame formats, etc.) plus the requirement to provide a flexible message mapping, you will need to apply some computing in form of an embedded processor system. Also, considering LIN's low-cost approach, the gateway hardware should be as simple as possible.
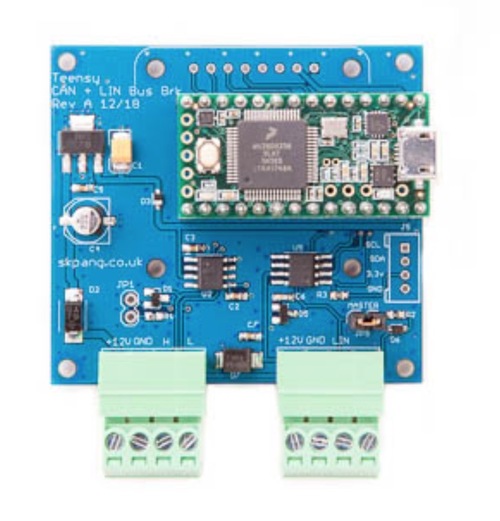
Consequently, we have chosen our Teensy 3.2 CAN Bus And LIN Bus Breakout Board, because it supports easy and flexible programming features through the Arduino IDE, and it supports both, CAN Bus and LIN Bus, on the same board.
The board comes with an onboard 5 VDC regulator with reverse voltage protection and a CAN Bus transceiver. The LIN Bus connection is provided by the Microchip MCP2004A chip.
The Teensy 3.2 is a complete USB-based microcontroller development system, compatible with Arduino software and libraries. It comes in a minimal footprint, capable of implementing a great variety of projects. All programming is accomplished via the onboard USB port.
As mentioned in the LIN/CAN comparison above, a gateway typically utilizes a LIN Master to communicate with the CAN Bus network. The LIN master node loops through each of the slave node, sending a request for information, and each slave responds with data when polled.

The LIN transceiver can be switched between Master (LIN = High) and Slave (LIN = Low) mode, which is accomplished on the board by using jumper J9 (Closed = Master).
The LIN Bus output (using our breakout board) is controlled per serial communication (UART) using the Arduino Serial1 command (RX1/TX1), while the CAN Bus communication is managed through the processor's internal CAN Bus controllers and onboard CAN Bus transceivers.
The programming of both serial ports, CAN and LIN, is supported by extensive software libraries.
Development Resources
Before addressing the programming resources, it is important to choose the means of simulating and testing the application. First of all, let's look into simulating the LIN Bus, i.e. we need a LIN slave node.
Our LIN Bus Slave RGB LED Breakout Board is an RGB LED breakout board based the the On Semi NCV7430 IC chip. The breakout board is controlled via a LIN-Bus connection, and it is ideal for use as a LIN Bus slave to test your LIN master software.
For testing the CAN Bus side, I'd recommend our CAN Bus To USB Mini Converter, which, in combination with the corresponding Windows software, represents a very economical solution to run an effective CAN Bus Analyzer. It allows you to develop, test, manage, and maintain your own CAN Bus network, as well as receiving, sending, logging, and analyzing CAN Bus data.
In regard to programming samples, we have a number of Github downloads:
- Demo software LIN master controlling APGRD004 RGB LED...
- Read the status of APGRD004 RGB LED...
- LIN slave demo...
- Arduino library for CAN on Teensy 3.1, 3.2, 3.5, and 3.6...
LIN-to-CAN Gateway Firmware Programming
Now that we have all necessary resources, I will prepare my setup and follow up with another post explaining details such as how to connect the various components and, finally, the LIN to CAN message mapping.
To follow up on the progress, refer to the follow-up section under Programmable LIN To CAN / CAN FD Gateway.
 Arduino Cookbook
Want to create devices that interact with the physical world? This cookbook is perfect for anyone who wants to experiment with the popular Arduino microcontroller and programming environment.
You will find more than 200 tips and techniques for building a variety of objects and prototypes such as toys, detectors, robots, and interactive clothing that can sense and respond to touch, sound, position, heat, and light.
You don''t need experience with Arduino or programming to get started. Updated for the Arduino 1.0 release, the recipes in this second edition include practical examples and guidance to help you begin, expand, and enhance your projects right away, whether you are an artist, designer, hobbyist, student, or engineer.
- Get up to speed on the Arduino board and essential software concepts quickly
- Learn basic techniques for reading digital and analog signals
- Use Arduino with a variety of popular input devices and sensors
- Drive visual displays, generate sound, and control several types of motors
- Interact with devices that use remote controls, including TVs and appliances
- Learn techniques for handling time delays and time measurement
- Apply advanced coding and memory handling techniques
 Loading... Please wait...

