 Loading... Please wait...
JCOM.J1939.USB-B – Firmware Versions & Update
The JCOM.J1939.USB-B board supports the full SAE J1939 protocol according to J1939/81 Network Management (Address Claiming) and J1939/21 Transport Protocol (TP). It also supports a serial protocol (per USB) to maintain communication with a host system, usually a PC. This protocol is being extended on occasion, either due to customer request or to add new features we deem beneficial for our customers.
Firmware History
V xx.yy.zz
xx = Major Modifications
yy = Minor Modifications
zz = Bug Fixes
- Version 1.00.00
- Initial release
- Version 1.00.01
- Added flash programming mode per jCOM1939 Monitor Software & FlashMagic
- Version 1.00.02
- Added periodic PGN transmission
- Misc. internal performance optimizations
- Version 1.10.00
- Allows switching between 250k and 500k baud rate
- Debugged flash mode programming per jCOM1939 Monitor Software & FlashMagic
- Version 1.11.00
- Increased number of message filters from 80 to 100
- Transmitting PGN = 0 did not include source address – Debugged
- Previous versions allowed to send periodic messages longer than 8 bytes, which is not compliant to J1939 standard.
- Misc. memory optimization to improve performance
- Version 1.12.00
- Further internal memory & performance optimization
- Version 1.20.00
- Resolved serial communication hiccups between gateway and PC, which prevented sending of messages longer than 256 bytes.
- Version 1.20.01
- Debug: CAN/J1939 LEDs were not lit when receiving or transmitting data. Some memory optimizations “backfired” – We blame the compiler for not recognizing variable definition inconsistencies between modules…
- Version 1.21.00
- Optimized serial communication (USB) between the board and PC.
- Version 1.21.02
- Further code optimizations to address high J1939 busload
Updating the jCOM.J1939.USB Firmware
In order to update the firmware, please follow the steps as described here:
1. Check the Firmware Version Number
In the jCOM1939 Monitor software, select the “Gateway” tab. Please make sure, the communication with the gateway was initiated by clicking “Start COM” command button, otherwise the gateway will not report the firmware version.
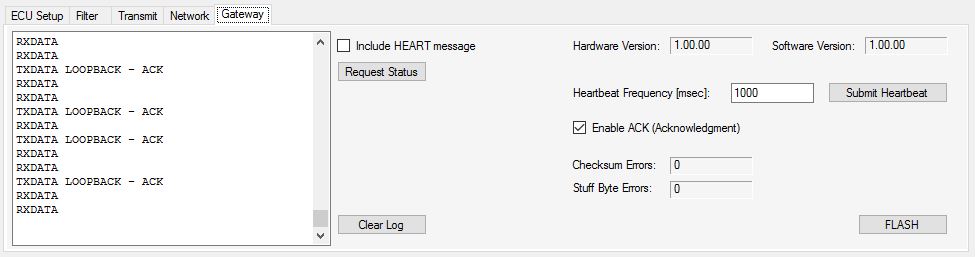
In the upper right position of the tab, check the Software Version number and verify it with the newest version as documented as shown above on this page.
2. Download the Firmware File
In order to update the internal program (i.e. the firmware), we provide a .hex file that can be loaded into the device either directly per USB port (see the following steps).
3. Activate the Flash Programming Mode
Important! Activating the Flash Programming Mode per jCOM1939 Monitor software will only work with firmware versions 1.10.00 and higher! If your firmware is lower than 1.10.00, please use the ISP/RST jumper method as described in the following chapter.
Coming back to the same section of the JCOM1939 Monitor software: First, please assure that the device is not connected to a running CAN/J1939 network.
Click on the “FLASH” command button. The program will prompt you to confirm the action, and if you click “Yes” the following will happen:
- The windows software will close, because it uses the same COM port you will need for FlashMagic.
- All three LEDs on the gateway will be on, indicating the flash programming mode.
4. Update the Firmware Using FlashMagic
The software (FlashMagic) required to load the firmware is a free download at:
Flash Magic is a PC tool for programming flash based micro-controllers from NXP using a serial or Ethernet protocol while in the target hardware.
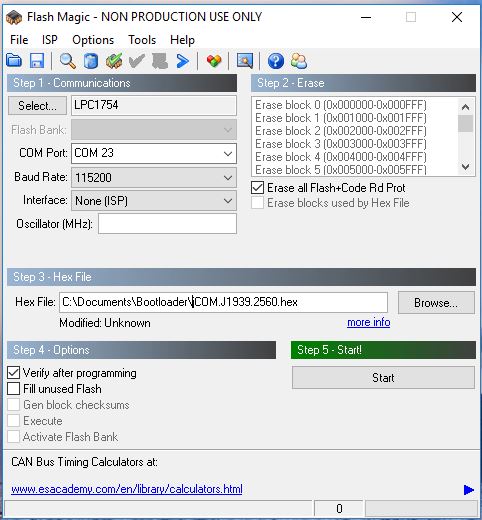
The above image shows the settings you need to apply. The only difference in your setup would be the choice of COM Port and the location and name of the .hex file.
Programming the Device
- Connect the jCOM.J1939.USB device’s USB port to your PC (unless already connected)
- Start FlashMagic and select COM port and .hex file location
- Make sure that all other settings match those in the image above
- On the jCOM board do the following (Not necessary when FLASH mode was activated through the jCOM1939 Monitor software):
- Close (i.e. connect) the ISP jumper
- Close the RST jumper
- Open the RST jumper
- Open the ISP jumper
- In the FlashMagic program click on Start
5. Reset the Gateway
After the flash programming process has finished, close FlashMagic, then reset the jCOM gateway, either by shortly jumpering RST or initiating a power-cycle (removing, then re-connecting the USB cable). Shortly after reset, you should see LED2 blinking with a one-second frequency.