JCOM.J1939.GPS – SAE J1939 GPS Module – Firmware Update
The JCOM.J1939.GPS device connects to an SAE J1939 network and reports the vehicle position (PGN 65267) with a five second frequency, according to the SAE J1939-71 Standard.
Firmware Updates
In order to allow on-site firmware updates, we have created a simple Windows program that enables the user to initiate the programming procedure (i.e. switching to FLASH mode).
Note: You will need a USB-to-RS232 adapter to connect the GPS module to your PC. Any standard adapter will do, but we also recommend using a standard straight RS232 cable, since some of these adapters use hex screws that collide with the RS232 port.
Recommended cable:

As shown above, the Windows software serves not only as a firmware updating tool, it also displays the current position, serving as a proof of concept.
Checking the Firmware and Windows Programming Tool Versions
In order to check the program versions of either the GPS module’s firmware or the Windows programming tool (or both), start the Windows program and initiate the connection to the module by clicking on Start COM. Shortly thereafter, the firmware version will be updated on the screen (as shown above using the example “jCOM.J1939.GPS – Firmware Version 1.00.00”). The Windows program version in this example is shown in the upper left corner as “jCOM.GPS – V 1.00.00.”
Firmware Versions
- Version 1.00.00
- Initial Release
- Version 1.01.00
- Memory Optimizations
- Version 1.02.00
- Added automatic CAN baud rate detection
- Version 1.03.00
- GPS communication optimized
- Version 2.00.00
- Added PGN 65254 – Time/Date
- Added PGN 65256 – Vehicle Direction/Speed
- Version 2.01.00
- Changed PGN 65254 (Time/Date) defaults for local minute & hour to indicate UTC (GMT)
- Changed PGN 65256 (Vehicle Direction/Speed) defaults to indicate that Pitch and Altitude are not supported
- Changed PGN 65267 (Vehicle Position) to a frequency of 1 second (was 5 seconds)
- Changed PGN 65256 (Vehicle Direction & Speed) to a frequency of 1 second (was On Request)
- Autobaud detection remains in silent mode indefinitely until a valid data frame is detected (was limited to 5 seconds)
1. Check the Firmware Version Number
In order to check the program versions of either the GPS module’s firmware or the Windows programming tool (or both), start the Windows program and initiate the connection to the module by clicking on Start COM. Shortly thereafter, the firmware version will be updated on the screen (as shown above using the example “JCOM.J1939.GPS – Firmware Version 1.00.00”). The Windows program version in this example is shown in the upper left corner as “jCOM.GPS – V 1.00.00.”
2. Download the Firmware File
In order to update the internal program (i.e. the firmware), we provide a .hex file that can be loaded into the device either directly per the RS232 port (see the following steps).
3. Activate the Flash Programming Mode
In the Windows program, click on the “FLASH” command button. The program will prompt you to confirm the action, and you need to click “Yes.” The windows software will close, because it uses the same COM port you will need for the FlashMagic programming tool.
4. Update the Firmware Using FlashMagic
The software (FlashMagic) required to load the firmware is a free download at:
Flash Magic is a PC tool for programming flash based micro-controllers from NXP using a serial or Ethernet protocol while in the target hardware.

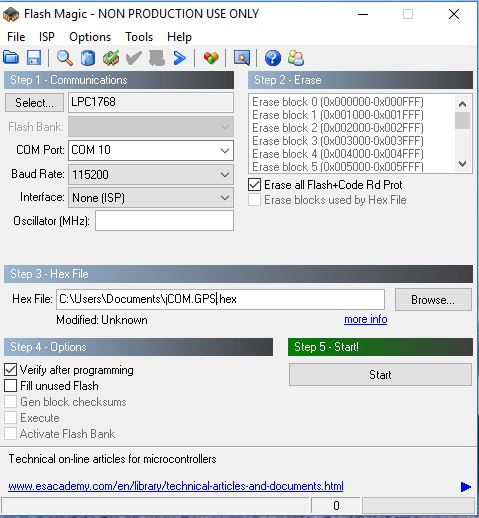
The above image shows the settings you need to apply. The only difference in your setup would be the choice of COM Port and the location and name of the .hex file.
Programming the Device
- Connect the GPS Module’s RS232 port to your PC (unless already connected)
- Start FlashMagic and select COM port and .hex file location
- Make sure that all other settings match those in the image above
- Activate the GPS Module’s FLASH mode as described previously.
- In the FlashMagic program click on Start
5. Reset the Gateway
After the flash programming process has finished, close FlashMagic, then reset the GPS Module by initiating a power-cycle (on-off).
 Loading... Please wait...
