 Loading... Please wait...
Recent Posts
PiCAN2, PiCAN3, and PiCAN-M Driver Installation for Raspberry Pi
Posted by on

This post provides you a brief overview on the steps required to install the software driver on the Raspberry Pi for use with the PiCAN2, PiCAN3, and PiCAN-M CAN Bus HATs, including the dual-port and SMPS versions.
Please refer also to the board's user manual.
Start by creating a new SD card image with the Raspberry Pi OS. Follow these instructions for the download. Boot the Pi to the CLI prompt.
First, accomplish an update. Using the CLI (Command Line Interface), type the following:
sudo apt-get update
sudo apt-get upgrade
sudo reboot
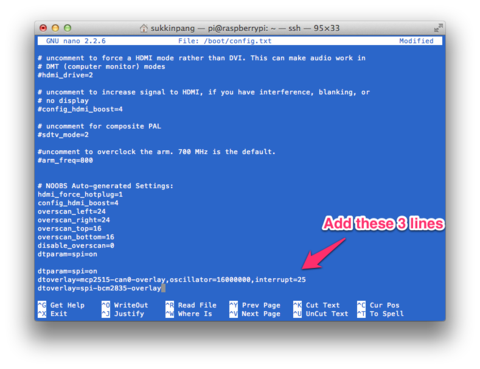
Add the overlays in:
sudo nano /boot/config.txt
For the single CAN port boards, add these three lines to the end of file:
dtparam=spi=on
dtoverlay=mcp2515-can0,oscillator=16000000,interrupt=25
dtoverlay=spi-bcm2835-overlay
For the dual CAN port boards, add these lines to the end of the file:
dtparam=spi=on
dtoverlay=mcp2515-can0,oscillator=16000000,interrupt=25
dtoverlay=mcp2515-can1,oscillator=16000000,interrupt=24
dtoverlay=spi-bcm2835-overlay
Reboot the Raspberry Pi:
sudo reboot
You can now bring the CAN interface up by typing:
sudo /sbin/ip link set can0 up type can bitrate 500000
For the dual CAN port boards, you add:
sudo /sbin/ip link set can1 up type can bitrate 500000
Check that there is no error message returned.
Now install the CAN utilities:
sudo apt-get install can-utils
To send a CAN message use :
cansend can0 7DF#0201050000000000
For the dual CAN port boards, you can also use:
cansend can0 7DF#0201050000000000
This will send a CAN ID of 7DF. Data 02 01 05 – coolant temperature request.