 Loading... Please wait...
Recent Posts
PiCAN2 Duo CAN Bus Board for Raspberry Pi - Functionality Test
Posted by on

The PiCAN2 DUO board provides two independent CAN Bus interfaces for the Raspberry Pi. It uses the Microchip MCP2515 CAN Bus controller with MCP2551 CAN Bus transceiver. Connections are made via a 4-way screw terminal. This board is also available with a 5VDC/1A SMPS (switch mode power supply) that can power both the Pi and the CAN Bus HAT. There is an easy-to-install SocketCAN driver, and programming can be accomplished in C or Python.
In our experience, many users are quick with connecting the PiCAN CAN Bus board to their CAN hardware, and they are frustrated when the communication doesn't work. In the vast majority of these cases, the problem is not with the PiCAN board but with the external connection. For that reason, we recommend testing the PiCAN board without external hardware, which helps to methodically pinpoint the problem.
The following describes a fairly simple method of "dry-testing" the board, i.e. without the need of connecting to a real-world CAN Bus network. The dual CAN Bus interface makes testing easy, because you already have two CAN Bus nodes available, which is sufficient to establish a network.
Note: It may sound obvious, but many users forget that you need a minimum of two nodes to establish a network, otherwise the CAN Bus controller will return error messages.
For the following test, we assume the following:
- You have setup the device (config.txt file) as described in the user manual.
- You have installed the demo programs, specifically candump and cansend as described in the user manual.
- You have both termination resistors activated by closing the corresponding jumpers.
- You have connected both CAN Bus ports, i.e. you have connected CAN_L to CAN_L and CAN_H to CAN_H.
- You have NOT initialized or accessed the board by means of an application software running on the Raspberry Pi.
In our case, we installed the demo programs in the /Documents/test-can_pi2 folder. Open a terminal window, switch to the folder where you have installed the programs, and initialize both CAN Bus ports:
sudo /sbin/ip link set can0 up type can bitrate 500000
sudo /sbin/ip link set can0 up type can bitrate 500000
We are using a CAN Bus baud rate of 500000 only as an example, but you can use any other bitrate as long as they match for both ports.
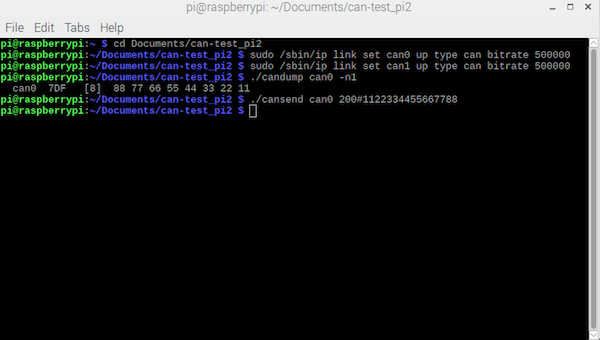
The initialization also represents a first test of the board, i.e. if the port is defective there will be an error message, otherwise there will be no response. Assuming that there is no error message, type the following command:
./candump can0 -n1
This line will print out the next CAN Bus data frame as soon as it was received. Now open a new terminal window, switch to the folder where you installed the sample programs, and here enter the following line:
./cansend can1 7DF#8877665544332211
This procedure sends a (randomly designed) CAN Bus data frame from port 1 to port 0. The result, i.e. the received data frame will be displayed in the other terminal window.
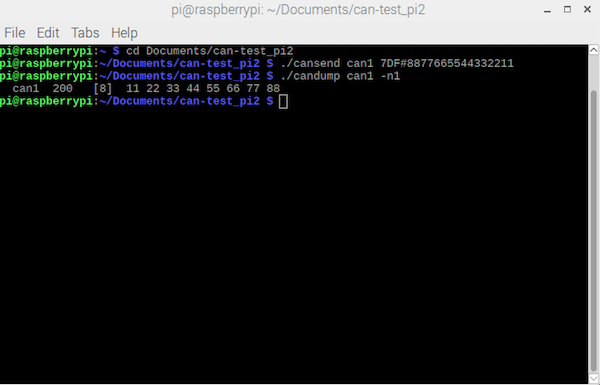
In our example, we repeated the procedure by sending date from port 0 to port 1.
If, however, you still have problems getting the board to communicate with your external CAN node, have a look at Troubleshooting your PiCAN2 CAN Interface Board for Raspberry PI.
Raspberry Pi User Guide, 4th Edition is the "unofficial official" guide to everything Raspberry Pi 3. Written by the Pi's creator and a leading Pi guru, this book goes straight to the source to bring you the ultimate Raspberry Pi 3 manual. This new fourth edition has been updated to cover the Raspberry Pi 3 board and software, with detailed discussion on its wide array of configurations, languages, and applications. You'll learn how to take full advantage of the mighty Pi's full capabilities, and then expand those capabilities even more with add-on technologies. You'll write productivity and multimedia programs, and learn flexible programming languages that allow you to shape your Raspberry Pi into whatever you want it to be. If you're ready to jump right in, this book gets you started with clear, step-by-step instruction from software installation to system customization.
The Raspberry Pi's tremendous popularity has spawned an entire industry of add-ons, parts, hacks, ideas, and inventions. The movement is growing, and pushing the boundaries of possibility along with it—are you ready to be a part of it? This book is your ideal companion for claiming your piece of the Pi.
- Get all set up with software, and connect to other devices
- Understand Linux System Admin nomenclature and conventions
- Write your own programs using Python and Scratch
- Extend the Pi's capabilities with add-ons like Wi-Fi dongles, a touch screen, and more
The credit-card sized Raspberry Pi has become a global phenomenon. Created by the Raspberry Pi Foundation to get kids interested in programming, this tiny computer kick-started a movement of tinkerers, thinkers, experimenters, and inventors. Where will your Raspberry Pi 3 take you? The Raspberry Pi User Guide, 3rd Edition is your ultimate roadmap to discovery.