 Loading... Please wait...
Recent Posts
Troubleshooting your PiCAN2 CAN Interface Board for Raspberry PI
Posted by on
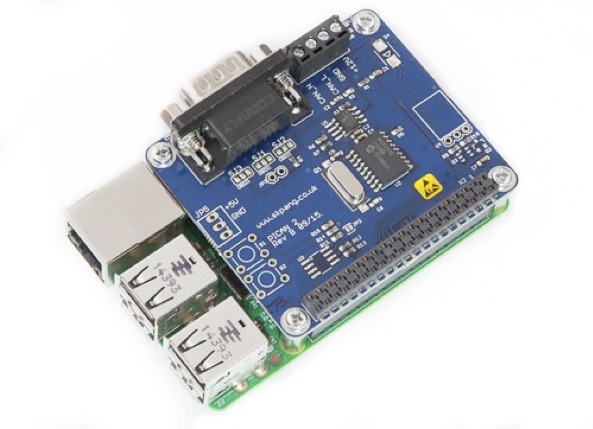
The PiCAN2 board series we offer through this website provides Controller Area Network (CAN) Bus capabilities for the Raspberry Pi.
And while the hardware has turned out to be exceptionally reliable, we receive requests for technical support on a regular basis.
However, the vast majority of these inquiries could be prevented by following some basic steps that prevent any potential troubles with your CAN application.
They are:
- Read the manual carefully - I don't mean any disrespect, but many questions may be answered right here. So please follow the instructions in the hardware manuals to the point. That is especially true for the settings in the /boot/config.txt file, which are documented correctly in our manual. Some forum entries point to these settings and recommend to change them, which did not solve anything, because the problem is somewhere else (See below items).
- Use the correct config.txt settings - This is actually a repetition of item 1., but to make it a point: I have literally installed hundreds of PICAN2 boards successfully just by applying the recommended config.txt settings and re-starting the RPi. These settings are:
dtparam=spi=on
dtoverlay=mcp2515-can0,oscillator=16000000,interrupt=25
dtoverlay=spi-bcm2835-overlay
Test the board by typing:
sudo /sbin/ip link set can0 up type can bitrate 500000
The only feedback from the OS would be an error message such as "Cannot find device can0," otherwise, when the board is working, there is no feedback.
If this method doesn't work, there are only two possibilities: 1. The Raspian OS has been screwed up, in which case you should start with a new installation, or 2. The board is defective, in which case please contact us. - Check your termination resistor - There is a 120 Ohm resistor installed on the board. To activate the terminator, solder a 2-way header pin to JP3, then insert a jumper. With only few exceptions you will need the termination resistor.
- Make sure the baud rates match - First of all, when you connect to a CAN network, find out what the baud rate is. Mismatched baud rates will cause an error message. Also, be sure which message ID length is being used (11 or 29 bits). The CAN controller can handle both lengths simultaneously, but if you need to establish bi-directional communication, the ID length should match.
- Check your DB9 configuration - If you are using the DB9 connector for your CAN Bus connection, please make sure you solder the corresponding jumpers to either OBD-II or Standard CAN mode. This is not necessary when you use the terminal block.
- You need a CAN Network to use the PiCAN2 - It may sound more than just obvious, but you need at least one other CAN node to establish communication (we have had requests for technical support in that direction where users did not understand why the candump and cansend program samples didn't work). For instance, if you want to read OBD-II messages, you can just use our OBD-II cable and connect the PiCAN2 to your automobile. In case of SAE J1939, we recommend our jCOM.J1939.USB gateway board to simulate J1939 data traffic. For all other applications, it might be a good idea to purchase a second PiCAN2 board.
- The PiCAN2 is a mere CAN Bus Interface - The PiCAN2 board is designed to receive and transmit mere CAN data frames. It provides some simple hardware configuration for OBD-II, but it is not specifically designed for OBD-II. OBD-II is a diagnostics protocol for automobiles that uses CAN as its hardware layer. The same is true for CANopen and SAE J1939, meaning the board does not directly support either protocol, and you need to install additional software for these protocols.
Note: At the time of this writing, I am not aware of any J1939 or CANopen protocol stack software packages that run directly on the Raspberry Pi in combination with the PiCAN2. You can buy source code, which is usually available for a few thousand dollars, and adjust it to run under the RPi & PiCAN2 configuration. - Make sure you know your protocol - Whether it's OBD-II, CANopen, or SAE J1939, it is mandatory you are familiar with the details. We have had many users who connect the PiCAN2 to an automobile to read CAN messages but don't know what to do with them.
- Using SAE J1939, consider the alternative - Yes, you can use the PiCAN2 board to monitor (read) SAE J1939 data frames, but when it comes to writing data into the network (e.g requesting data such as Vehicle Identification Number) you will need to run a full J1939 protocol stack. Instead of using the PiCAN2, consider the alternative, namely our SAE J1939 Turbo Interface for Raspberry Pi.
In the following I am listing a number of documents referring to wiring CAN Bus (which includes CANopen), DeviceNet and SAE J1939 networks as well as a trouble-shooting guide:
- CANopen Network CAN bus Cabling Guide - Application Note by Copley Controls
- CAN Wiring - Notes on wiring of CAN-Bus Systems and cable selection by esd electronics
- CAN Bus trouble-shooting guide by esd electronics
- SAE J1939 Wiring Requirements
- Practical testing of the CAN physical layer - CiA Newsletter
- DeviceNet trouble-shooting
- ODVA DeviceNet planning and installation manual
Last, but not least, for more detailed information, we recommend reading A Comprehensible Guide to Controller Area Network.
Despite of all I wrote, please feel free to contact us if you feel that we can improve our documentation. We listen to our customers, and it is in our best interest to provide as much as possible help and advice.
Raspberry Pi User Guide, 4th Edition is the "unofficial official" guide to everything Raspberry Pi 3. Written by the Pi's creator and a leading Pi guru, this book goes straight to the source to bring you the ultimate Raspberry Pi 3 manual. This new fourth edition has been updated to cover the Raspberry Pi 3 board and software, with detailed discussion on its wide array of configurations, languages, and applications. You'll learn how to take full advantage of the mighty Pi's full capabilities, and then expand those capabilities even more with add-on technologies. You'll write productivity and multimedia programs, and learn flexible programming languages that allow you to shape your Raspberry Pi into whatever you want it to be. If you're ready to jump right in, this book gets you started with clear, step-by-step instruction from software installation to system customization.
The Raspberry Pi's tremendous popularity has spawned an entire industry of add-ons, parts, hacks, ideas, and inventions. The movement is growing, and pushing the boundaries of possibility along with it—are you ready to be a part of it? This book is your ideal companion for claiming your piece of the Pi.
- Get all set up with software, and connect to other devices
- Understand Linux System Admin nomenclature and conventions
- Write your own programs using Python and Scratch
- Extend the Pi's capabilities with add-ons like Wi-Fi dongles, a touch screen, and more
The credit-card sized Raspberry Pi has become a global phenomenon. Created by the Raspberry Pi Foundation to get kids interested in programming, this tiny computer kick-started a movement of tinkerers, thinkers, experimenters, and inventors. Where will your Raspberry Pi 3 take you? The Raspberry Pi User Guide, 3rd Edition is your ultimate roadmap to discovery.