 Loading... Please wait...
Recent Posts
How To Boost The Performance And Industrial Strength Of Your Raspberry Pi
Posted by on
In general, the Raspberry Pi is a low cost, credit-card sized computer that plugs into a computer monitor or TV, and uses a standard keyboard and mouse. It is a capable little device that enables people of all ages to explore computing, and to learn how to program in languages like Scratch and Python. It’s capable of doing everything you would expect a desktop computer to do, from browsing the internet and playing high-definition video, to making spreadsheets, word-processing, and playing games.
While all these features will satisfy users focussing on mere desktop computer tasks, there are some shortcomings for those who would like to see better performance in an industrial environment. Due to its price and ease-of-handle, the Raspberry Pi is also a popular embedded system for industrial prototyping.
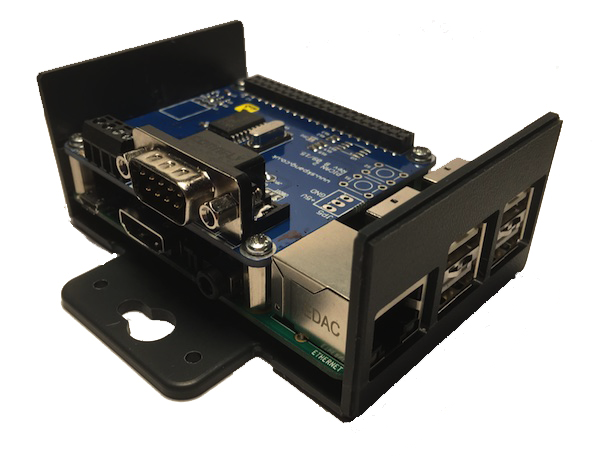
As an example, we are successfully selling CAN (Controller Area Network) interfaces for the Raspberry Pi as shown in the image above. The connection to the CAN bus allows access to industrial controls (CANopen), automotive diagnostics (ODB-II), and diesel engines (SAE J1939), just to name a few.
So what would it take to push the Raspberry Pi to more industrial strength? First, let's have a look at the requirements for industrial (and even military) applications that are currently not fulfilled:
- Fast Boot
- Extended Power Supply Range
- Extended Temperature Range
Fast Boot
I am currently using a Raspberry Pi B+ with a ScanDisk 16 GB micro HC I memory card, and the boot time is a whopping 45 seconds. This is still faster than my brand new Windows 10 computer, but compare that to any embedded solution (e.g. our jBoard-X2) where the startup time is measured in mere milliseconds.
Also, compare it to the less than 10 seconds of the BeagleBone Green, a system with a design close to the Raspberry Pi but leaning more towards industrial and IoT (Internet of Things) applications. Other than the Raspberry Pi, the BeagleBone does not boot from an SD Card, and the SD Card represents the major bottleneck when it comes to higher performance.
When it comes to evaluating SD cards in terms of speed, the most important thing to look at is the "class" of the card as labeled by the manufacturer. These are numerical values, indicated within a small circle, in which higher is better with class 10 is the fastest, with class 8 being slower, down to class 2 which is the slowest. However, high-end cards use the Ultra High Speed standard (UHS) which is shown as a "1" or "3" within a "U" shape. So, you should typically look for SD Cards that are UHS-I or UHS-II models to ensure the fastest speeds possible.
The UHS-I models offer read speeds of at least 90MB/s and write speeds of 80MB/s or better, while the UHS-II cards have incredibly fast speeds of 280MB/s when reading and 180MB/s or better while writing data.
The downside here is, of course, the increased system price, where a UHS-II SD card can easily add another US$60 and more (According to the official website, the RPi supports up to 32 GB).
Extended Power Supply Range
The Raspberry Pi developers have chosen a 5V micro-USB jack to supply power to the board. Model B owners using networking and high-current USB peripherals will require a supply which can source 700mA (many phone chargers meet this requirement). Model A owners with powered USB devices will be able to get away with a much lower current capacity (300mA) - See also the post Power Supply Confirmed as 5V Micro USB.
However, many industrial applications provide 24 VDC, automotive applications use 12 VDC, and on diesel engines (trucks, trains, ships, etc.) the voltage may vary between 8 and 32 VDC from the very same power supply.
I am not a hardware specialist, but I believe that you can apply voltage to the Raspberry Pi through the 40-pin onboard header, and thus it is possible to use an external DC/DC converter such the one found at digikey.com (just as an example).
In terms of CAN bus interfaces, the PiCAN 2 SMPS comes with a switch mode power supply allowing a voltage range from 6 to 30 VDC.
Extended Temperature Range
Unfortunately, this is the point where there is no easy solution. Like any desktop computer, the Raspberry Pi is officially designed for a temperature range between 0 and 70 degrees Celsius (Sorry, but Celsius is a virtual industry standard). For most industrial applications, this range is sufficient. However, when it comes to harsher environments (think mining trucks during an Alaskan winter or exposure to direct sunlight in the Carribean), there could be problems.
It appears, nevertheless, that the Raspberry Pi is tougher than specified as I have already described in my post Raspberry Pi Proven To Withstand Extended Temperature Range. The same toughness does, however, not apply to the vast majority of RPi add-on boards. The best solution is still keeping the Raspberry Pi in a comfortable (heated or air-conditioned) environment.

Programming the Raspberry Pi - Getting Started with Python
Learn to create inventive programs and fun games on your powerful Raspberry Pi―with no programming experience required. This practical book has been revised to fully cover the new Raspberry Pi 2, including upgrades to the Raspbian operating system. Discover how to configure hardware and software, write Python scripts, create user-friendly GUIs, and control external electronics. DIY projects include a hangman game, RGB LED controller, digital clock, and RasPiRobot complete with an ultrasonic rangefinder.
- Updated for Raspberry Pi 2
- Set up your Raspberry Pi and explore its features
- Navigate files, folders, and menus
- Write Python programs using the IDLE editor
- Use strings, lists, functions, and dictionaries
- Work with modules, classes, and methods
- Create user-friendly games using Pygame
- Build intuitive user interfaces with Tkinter
- Attach external electronics through the GPIO port
- Add powerful Web features to your projects