Recent Posts
ESP32 DC Motor PWM Speed Control (Pulse Width Modulation) - The Hidden Facts
Posted by on

Lately, I have worked on two projects requiring DC motor control per PWM (Pulse Width Modulation). What both projects had in common was a profound lack of documentation regarding PWM control, specifically the side effects that have a significant impact on the programming.
This post aims to point to these quirks that may cause considerable headaches during the software development phase. In the first case, the task was to control a Thomson Eletrak Linear Actuator per Arduino Due. Based on my experience, I have written several posts addressing the learning curve and conclusions. These posts are:
- Thomson Electrac HD Linear Actuator - Fatal Error Flag at Low Speed - Copperhill (copperhilltech.com)...
- Thomson Electrak HD Linear Actuator - Multiple Actuators in the Same Network Will Empty the Batteries - Copperhill (copperhilltech.com)...
Luckily, my experience with the linear actuator control helped me to avoid similar delays with the second project, which required controlling up to four DC motors per CAN Bus, specifically SAE J1939. Here, I chose the ESP32 processor, which represents my first choice for development and prototyping.
To mention it upfront, programming PWM-based motor control using either the Arduino series of processors or the ESP32 is ridiculously easy. Also, I will not needlessly repeat information on PWM basics and the actual programming. These topics have been documented greatly, and I have listed references below. I used the same references successfully for my ESP32 project. However, as I mentioned previously, some quirks have not been sufficiently explained in any examples I found online.
The Problem: The general perception is that you can easily control a DC motor anywhere between zero and maximum speed. However, that is not the case.
Note: I have been involved with programming motion controllers in the past, but I am far from being a motion control expert. Any experienced motion control engineer may cringe, given my observations and conclusions. Nevertheless, my projects work. If you feel compelled to add a comment, please feel free to contact me (constructive contribution or criticism is appreciated).
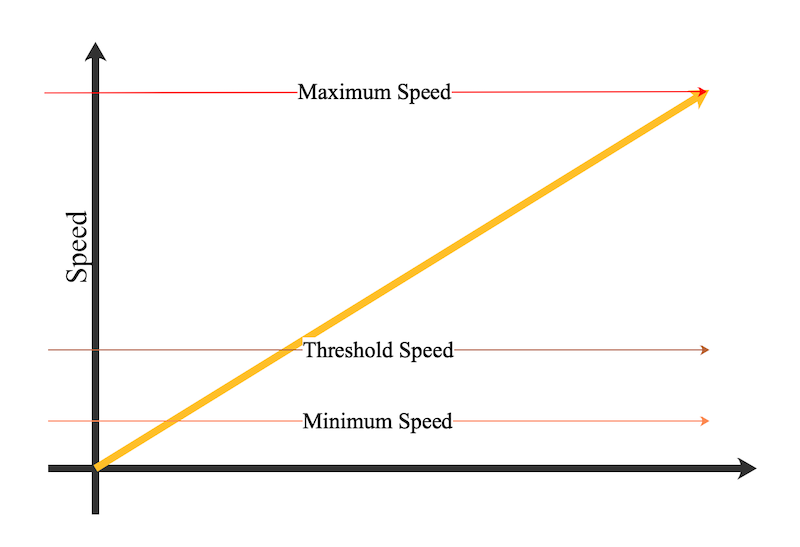
The problem is with the minimum speed, i.e., the DC motor cannot move below a certain minimum PWM duty cycle.
I found a few comments, addressing this effect, in the posts listed below:
For the [PWM] frequency we’re using, when you apply duty cycles smaller than 200, the motor won’t move and will make a weird buzz sound. So, that’s why we set a duty cycle of 200 at the start.
Reference: ESP32with DC Motor - Control Speed and Direction | Random Nerd Tutorials...
Suppose the duty is zero, the motor does not run, and when the duty cycle is 100 %, the motor moves at maximum RPM. But this concept is not always right because the motor starts running after being given some fixed voltage, which is called the threshold voltage.
Reference: DCMotor Speed Control Using Arduino & PWM - (duino4projects.com)...
According to the Thomson Electrak user manual (obviously the most professional explanation), the "PWM driver will not provide enough voltage for the motor to operate properly under 20% utilization; therefore, 20% should be considered a lower limit for speed control."
However, even this last explanation does not address the full extent of the limitations involved. There is a second speed limit, somewhat higher than the minimum speed, at which the motor can run but cannot start when this speed is applied at motion start. The effect is the "buzzing" mentioned above, meaning the motor does not move.
According to the above-referenced comments, I call this the "threshold speed" (again, correct me if necessary). In the case of the linear actuator, the threshold speed also depends on the gear's condition, i.e., older gears require a higher threshold speed due to mechanical wear.

Note: The definition of minimum and threshold duty cycle differs from motor to motor. I played with the duty cycle settings in my test setup to determine the limits.
Regarding the programming, you need to consider the following:
- When the required duty cycle (speed) is at or below the minimum speed, you must stop the motor.
- When you need to start the motor at a speed between minimum and threshold speed, apply a velocity higher than the threshold for a short time, then continue with the initially required speed.
Item 2 is demonstrated in the programming sample found at DC Motor Speed Control Using Arduino & PWM - (duino4projects.com):
analogWrite(out1, 255); // Apply max. speed
delay(10); // Wait for 10 msec
analogWrite(out1, 175); // Apply desired speed
This sample refers to an Arduino processor, but the basic algorithm is the same for the ESP32.
References:
- ESP32 with DC Motor - Control Speed and Direction | Random Nerd Tutorials...
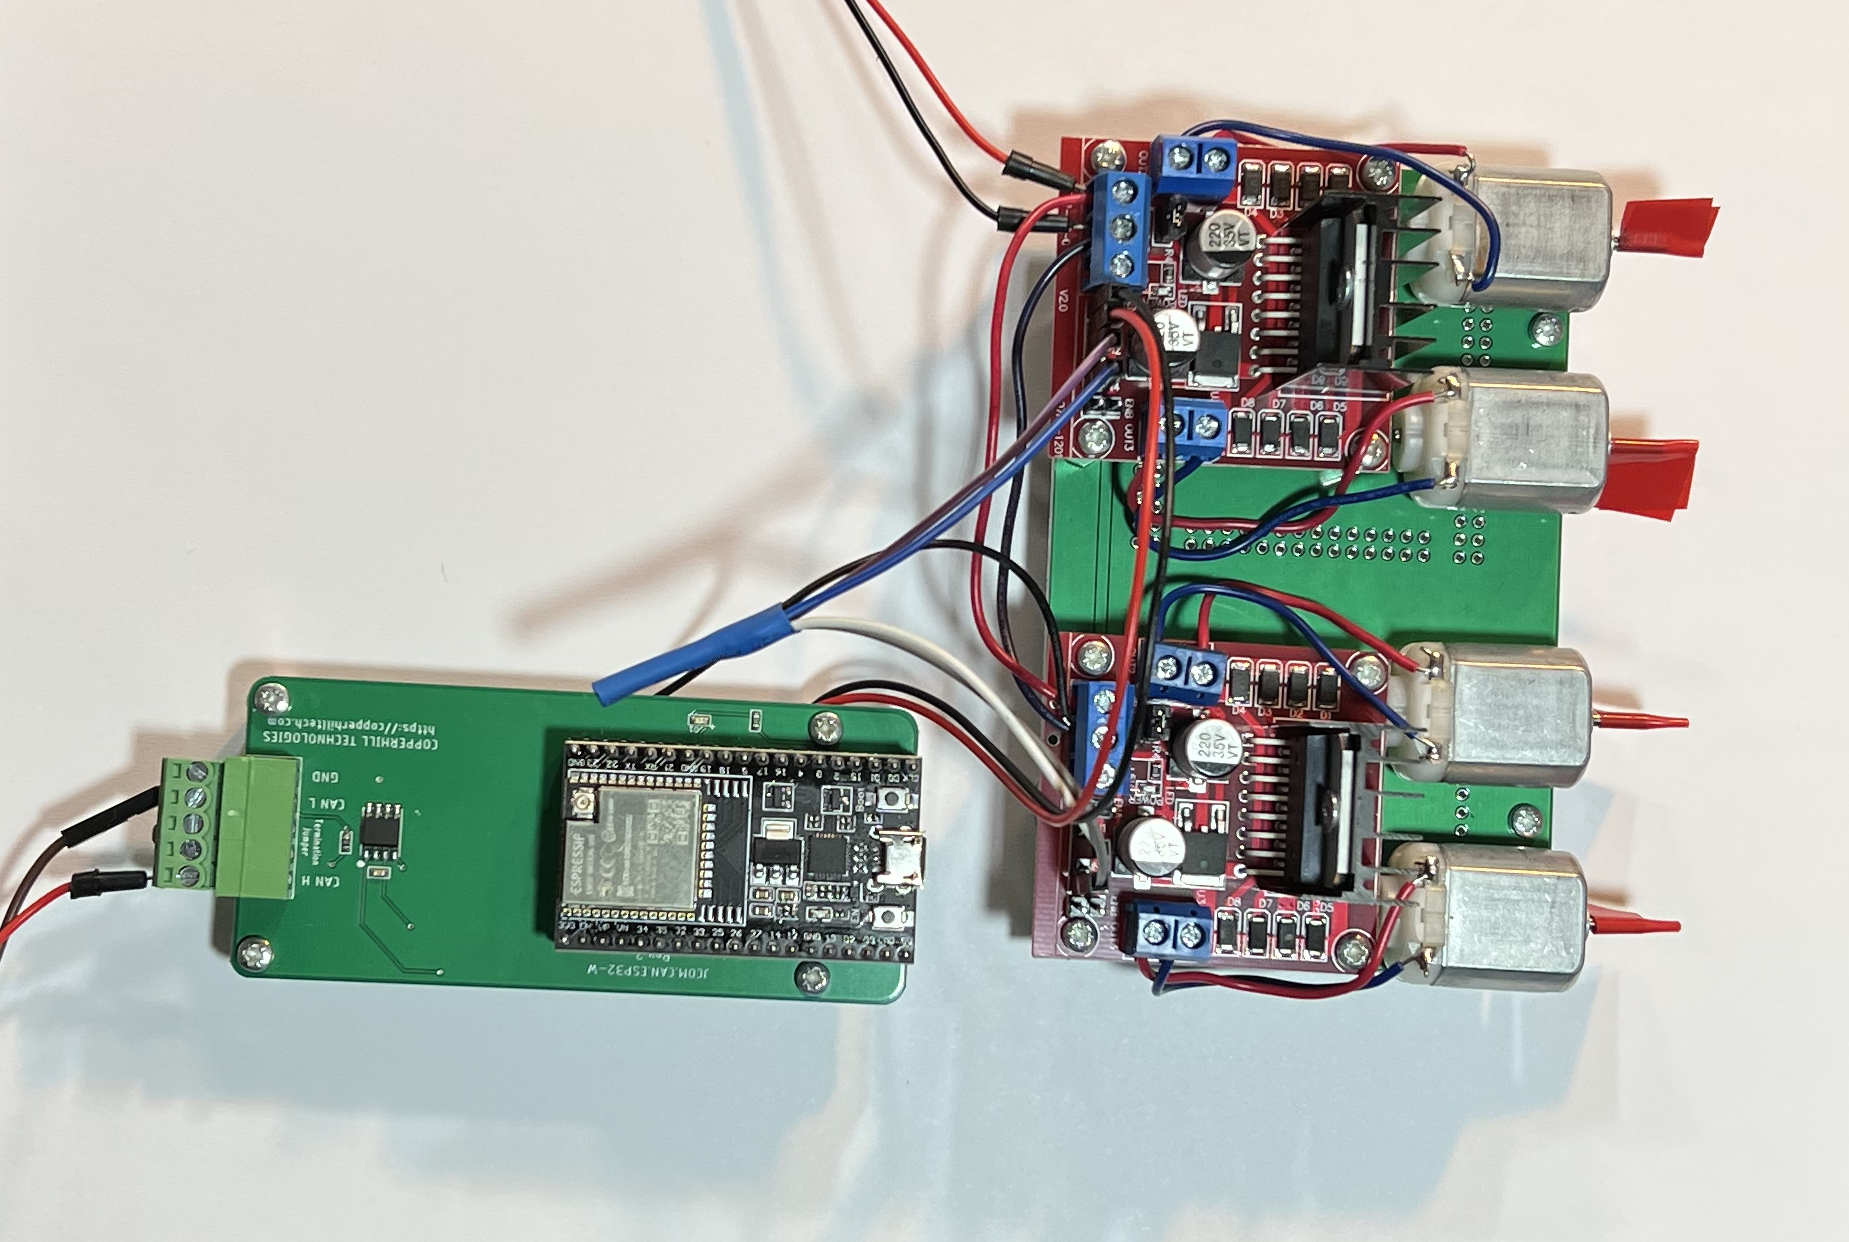
This is the setup (motor & drive) and the programming I used for my project. - ESP32 PWM Tutorial & Examples (AnalogWrite) - Arduino – DeepBlue (deepbluembedded.com)...
- Speed Control of DC Motor using Arduino applying PWM. | Elex-Focus (elexfocus.com)...
- Motor Control Pulse Width Modulator (MCPWM) - ESP32 - — ESP-IDF Programming Guide v5.0 documentation (espressif.com)...
 Electronics Projects with the ESP8266 and ESP32: Building Web Pages, Applications, and WiFi Enabled Devices
Copperhill Technologies highly recommends using this book for your wireless application projects. Yes, many good books and free online resources are available these days, but this is the book we are using. It made our approach to Bluetooth, BLE, and WIFI a breeze. Programming wireless applications without hassles was fun, and we will share them on this web page.
Projects throughout the book utilize the wireless functionality and processing power of the ESP microcontrollers. Projects are built in the Arduino IDE, so you don't need to download other programming software. In addition, mobile apps are now ubiquitous, making the app build projects of the book very relevant, as are the web page design projects.
In Electronics Projects with the ESP8266 and ESP32, you'll see how easy and practical it is to access information over the internet, develop web pages, build mobile apps to remotely control devices with speech recognition, or incorporate Google Maps in a GPS route tracking app. More Information...
 Loading... Please wait...
