 Loading... Please wait...
Recent Posts
Controller Area Network (CAN) Prototyping With Teensy 3.1/3.2
Posted by on
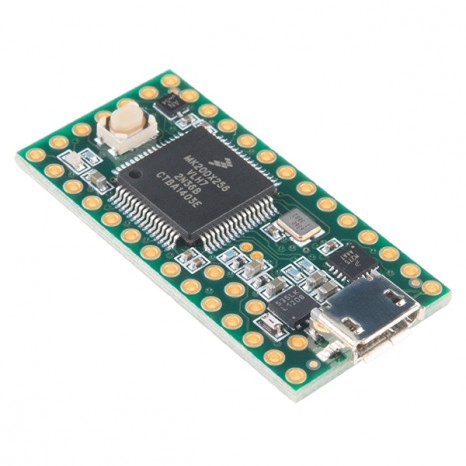
The Teensy is a breadboard-friendly development board that comes with loads of features in a very small package. Each Teensy 3.1 or 3.2 comes pre-flashed with a boot-loader so it can be programmed using the on-board USB connection, i.e. there is no external programmer required. You can program for the Teensy in your favorite program editor using C or you can install the Teensyduino add-on for the Arduino IDE and write Arduino sketches for Teensy.
The processor on the Teensy can emulate any kind of USB device you need it to be, making it great for USB-MIDI and other HID projects. The 32 bit processor brings a few other features to the table as well, such as multiple channels of Direct Memory Access, several high-resolution ADCs and even an I2S digital audio interface! There are also 4 separate interval timers plus a delay timer! All pins have interrupt capability, and the board provides system voltage of 3.3V to other devices at up to 100mA.
For more detailed information on the Teensy see: http://pjrc.com.
Dimensions:
1.4 x 0.7" (~35 x 18 mm)
Features:
- 32 bit ARM Cortex-M4 72 MHz CPU (M4 = DSP extensions)
- 256K Flash Memory, 64K RAM, 2K EEPROM
- 21 High Resolution Analog Inputs (13 bits usable, 16 bit hardware)
- 34 Digital I/O Pins (5V tolerance on Digital Inputs)
- 12 PWM outputs
- 7 Timers for intervals/delays, separate from PWM
- USB with dedicated DMA memory transfers
- 3 UARTs (serial ports)
- SPI, I2C, I2S,CAN Bus, IR modulator
- I2S (for high quality audio interface)
- Real Time Clock (with user-added 32.768 crystal and battery)
- 16 DMA channels (separate from USB)
- Touch Sensor Inputs
- CAN Port
The Controller Area Network (CAN) Port
According to some promotional online material, "...you can slap in on a breadboard and get to work!" Well, that statement is somewhat inconsistent with reality. I am repeating myself here by saying that any such development board is useless without additional hardware (unless you are satisfied with a blinking onboard LED, the embedded equivalent of "Hello World!").
In case of working with the CAN port, you will need a CAN transceiver in order to connect the board to a real CAN bus network. The best choice for adding a CAN transceiver, in terms of size and electrical compatibility, is the CAN Bus Mini Breakout Board we offer through this website.
However, to make things worse (it appears as if CAN is not treated with high priority), information on connecting the CAN port and even its programming is hard to come by.
Let me quote two comments I found on the pjrc.com forum:
“Does anybody know how to access the internal CAN? Or am I getting something wrong. The CPU datasheet gives no clues. How am I supposed to "talk" with it?”
“If by "quite a capable device" you mean the CAN documentation in the datasheet is insanely complicated, yes I agree!” (The provided datasheet "K20 Sub-Family Reference Manual" is 1,377 pages long).
The following picture (courtesy pjrc.com) shows the Teensy 3.2 pinout.
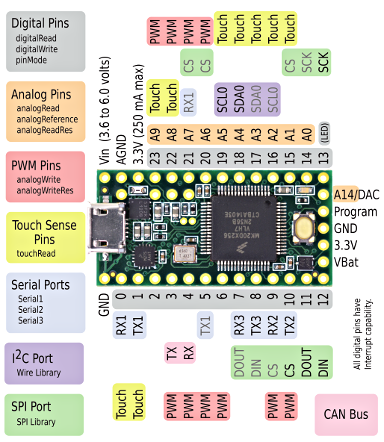
In regards to the CAN port both types, 3.1 and 3.2, are compatible, meaning the CAN port is assigned to pins 3 (TX) and 4 (RX). In my personal view a pin description such as CAN_RX and CAN_RX would be a bit more efficient than the crappy color coding.
For programming the Teensy 3.1 or 3.2 you will need to use the FlexCAN library at https://github.com/teachop/FlexCAN_Library.
The following image shows my current test configuration:
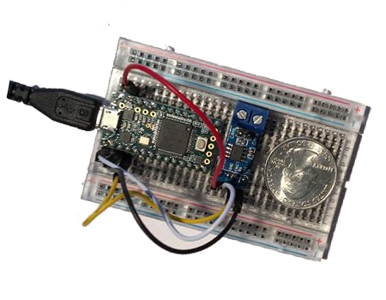
I have successfully installed the Teensyduino add-on software to my Arduino IDE under Windows 10. In this case I had to right-click the installation program and choose "Run in administrator mode." After that everything work fairly smoothly and I was able to run my embedded "Hello World" example, i.e. the blinking LED. I will follow up with another post about programming the Teensy's CAN interface.
Making Embedded Systems - Design Patterns for Great Software
Interested in developing embedded systems? Since they don't tolerate inefficiency, these systems require a disciplined approach to programming. This easy-to-read guide helps you cultivate a host of good development practices, based on classic software design patterns and new patterns unique to embedded programming. Learn how to build system architecture for processors, not operating systems, and discover specific techniques for dealing with hardware difficulties and manufacturing requirements.
Written by an expert who's created embedded systems ranging from urban surveillance and DNA scanners to children's toys, this book is ideal for intermediate and experienced programmers, no matter what platform you use.
- Optimize your system to reduce cost and increase performance
- Develop an architecture that makes your software robust in resource-constrained environments
- Explore sensors, motors, and other I/O devices
- Do more with less: reduce RAM consumption, code space, processor cycles, and power consumption
- Learn how to update embedded code directly in the processor
- Discover how to implement complex mathematics on small processors
- Understand what interviewers look for when you apply for an embedded systems job