- Home
- Documentation
- PiCAN2 - Controller Area Network (CAN) Interface for Raspberry Pi
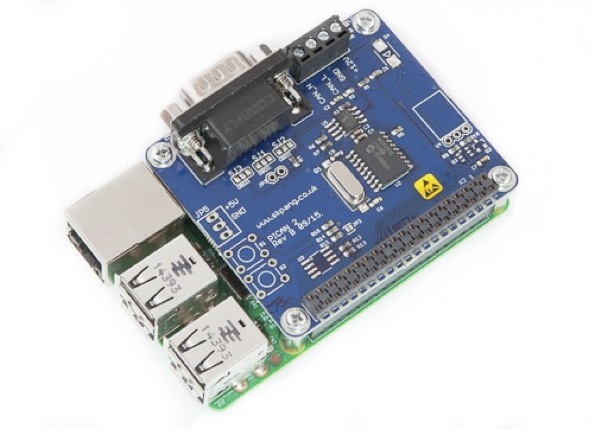
PiCAN2 - Controller Area Network (CAN) Interface for Raspberry Pi
PiCAN 2 User Guide
- CAN v2.0 A/B at 1 Mb/s
- High speed SPI Interface (10 MHz)
- Standard and extended data and remote frames
- CAN connection via standard 9-way sub-D connector or screw terminal
- Compatible with OBDII cable
- Solder bridge to set different configuration for DB9 connector
- 120Ω termination resistor
- Serial LCD ready
- LED indicator
- Foot print for two mini push buttons
- Four fixing holes, comply with Pi Hat standard
- SocketCAN driver, appears as can0 to application
- Interrupt RX on GPIO25
Table of Content
- Hardware Installation
- Configuring DB9 Connector
- OBD-II Cable
- CAN Cable
- Screw Terminal
- Termination Resistor
- Software Installation
- Initializing the CAN Interface
- Python Applications
- C Applications
Hardware Installation
Before installing the board make sure the Raspberry is switched off. Carefully align the 40way connector on top of the Pi. Use spacer and screw (optional items) to secure the board.

Configuring the DB9 Connector
The CAN connection sis available via the DB9 connector. The connector can be configured for different pinout, either for ODB-II or standard CAN.
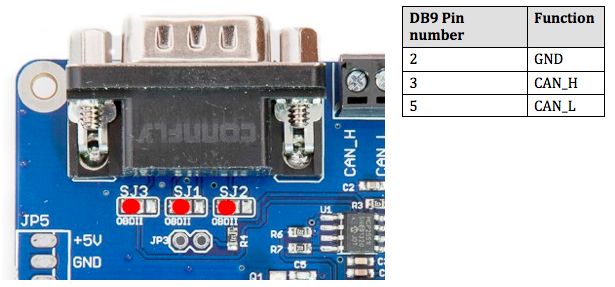
ODB-II Cable
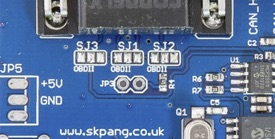
Close the solder bridges on the lefthand side on SJ1, SJ2 and SJ3 as indicated below with a red dot.
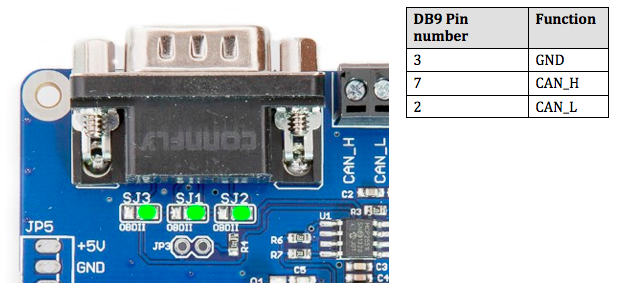
Standard CAN Cable
Close the solder bridges on the righthand side on SJ1, SJ2 and SJ3 as indicated below with a green dot.
Screw Terminal
The CAN connection can also be made via the 4 way screw terminal.
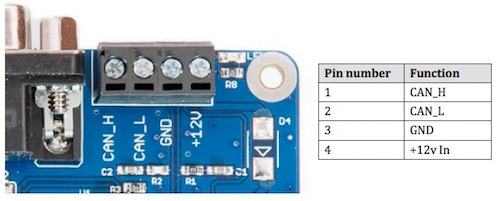
Note: The +12 V Input is only used on the PiCAN2 board with SMPS option installed.
Termination Resistor
There is a 120 Ohm resistor installed on the board. To activate the terminator, solder a 2-way header pin to JP3, then insert a jumper.
Software Installation
It is best to start with a brand new Raspbian image. Download the latest version from: https://www.raspberrypi.org/downloads/raspbian/
After first time boot up, do an update and upgrade first:
sudo apt-get update
sudo apt-get upgrade
sudo reboot
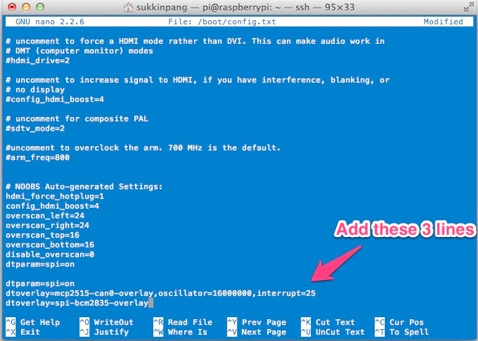
Add the overlays by entering:
sudo nano /boot/config.txt
Add these 3 lines to the end of file:
dtparam=spi=on
dtoverlay=mcp2515-can0,oscillator=16000000,interrupt=25
dtoverlay=spi-bcm2835-overlay
Reboot the Raspberry Pi:
sudo reboot
Initializing the CAN Interface
You can now initialize the CAN interface by entering:
sudo /sbin/ip link set can0 up type can bitrate 500000
Now install the CAN utilities:
sudo apt-get install can-utils
Note: In order to execute the individual test programs, use the following command:
chmod u+x cansend
chmod u+x candump
Connect the PiCAN2 to your CAN network via screw terminal or DB9. To send a CAN message use :
./cansend can0 7DF#0201050000000000
This will send a CAN 11-bit ID of 7DF. Data 02 01 05 – coolant temperature request.
To send the same data with a 29-bit message ID, use:
./cansend can0 000007DF#0201050000000000
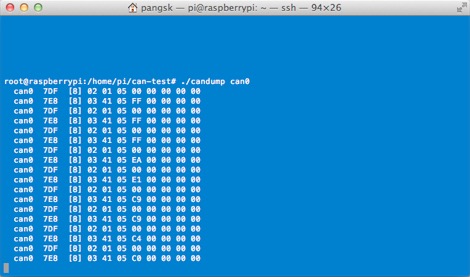
Connect the PiCAN to a CAN-bus network and monitor traffic by using the command:
./candump can0
You should see something like this:
Python Applications
Install python-can:
pip3 install python-can
Bring the CAN interface up if it is not already done:
sudo /sbin/ip link set can0 up type can bitrate 500000
Now start python3:
python3
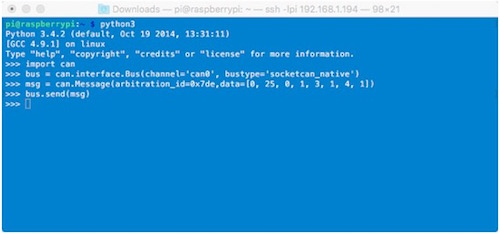
To sent a message out type the following lines:
import can
bus = can.interface.Bus(channel='can0', bustype='socketcan_native')msg= can.Message(arbitration_id=0x7de, data=[0, 25, 0, 1, 3, 1, 4, 1], extended_id=False)
bus.send(msg)
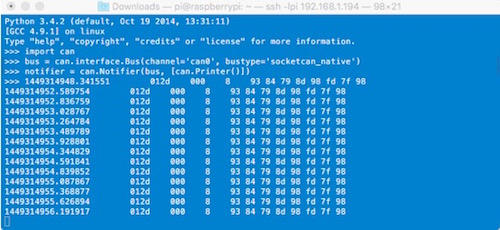
To receive messages and display them on the screen, type:
notifier = can.Notifier(bus, [can.Printer()])
C Applications
Bring the CAN interface up if it is not already done:
sudo /sbin/ip link set can0 up type can bitrate 500000
Download the source code and example files by typing the following in the command prompt:
wget http://skpang.co.uk/dl/cantest.tar
Unpack the tar file and change into a directory:
tar xf cantest.tar cd linux-can-utils
The example file is called cantest.c to edit this file, type the following in the command prompt:
nano cantest.c
Line 77 is the CAN message to be sent out.
unsigned char buff[] = "7DF#0201050000000000";
7DF is the message ID and 0201050000000000 is the data. Change the data to suit. Press CTRL-X to exit.
To compile the program type:
make
Check there are no errors. To run the program type:
./cantest
 Learn to create inventive programs and fun games on your powerful Raspberry Pi―with no programming experience required. This practical book has been revised to fully cover the new Raspberry Pi 2, including upgrades to the Raspbian operating system. Discover how to configure hardware and software, write Python scripts, create user-friendly GUIs, and control external electronics. DIY projects include a hangman game, RGB LED controller, digital clock, and RasPiRobot complete with an ultrasonic rangefinder.
- Updated for Raspberry Pi 2
- Set up your Raspberry Pi and explore its features
- Navigate files, folders, and menus
- Write Python programs using the IDLE editor
- Use strings, lists, functions, and dictionaries
- Work with modules, classes, and methods
- Create user-friendly games using Pygame
- Build intuitive user interfaces with Tkinter
- Attach external electronics through the GPIO port
- Add powerful Web features to your projects
 Loading... Please wait...

